Changing or Moving the Select Patient Columns
The columns that display on the Patient Select screen can be moved, added or removed if required.
To enable a member of staff to change the columns in the Select Patient screen:
-
From the Vision 3 front screen, select Management Tools - Control Panel - Security.
-
Right click on the member of staff to update and select Edit.
-
The User Details screen displays, tick Enable Browse Config window.
-
Select OK to save.
To configure the columns that display on the Select Patient screen:
-
From any screen where you can choose a patient, for example, Consultation Manager or Registration, choose Select Patient
 and search for any patient in the usual way, see Selecting a Patient for details if required.
 -
Double click on the small square to the left of the column headers:

-
The List Settings screen displays:
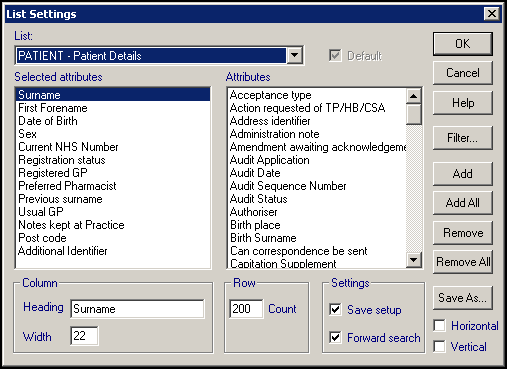
Select the following as required:
-
Selected attributes - Displays the information that displays on the Select Patient screen. Highlight and select Remove to remove the column from the Select Patient screen. Attributes display in the order selected.
-
Attributes - Lists the columns you can select from, highlight and select Add to add the column to the Select Patient screen.
-
Column - Highlight any attribute in selected Selected attributes and update the Heading name and Width if required.
-
Row - Do not update.
-
Settings - Do not update.
-
Horizontal - Do not update.
-
Vertical - Do not update.
-
Filter - Do not update.
-
Save As - Do not use.
-
-
Select OK to save.
Useful examples:
-
You may want to see which of your branches a patient uses. If you record this information in Registration - Other - Notes Kept at, you could add this to the Selected attributes list.
Training Tip - This is very useful for online prescription requests. -
You may want to see 'Known As' from the Patient Select screen. If you enter this information in Registration - Notes - Administrative Notes, you could add this to the Selected attributes list and renamed it to 'AKA'.