Creating an Action
To add a new Action:
- From Control Panel
 - Mail Maintenance, select the Actions tab.
 - Right click on either Frequent Actions or Additional Actions and select Add action.
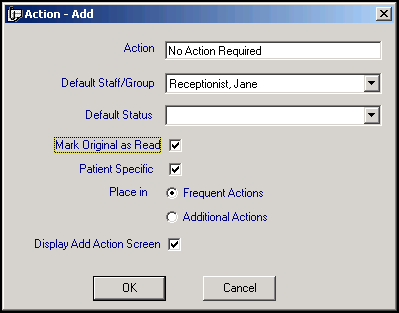
- The Action - Add screen displays:

- Complete as required:
- Action - Enter the text you require on the Action, for example:
- No Action Required
- Pt to make appointment
- Dr to contact patient
- Patient to collect script
- Repeat Test
- Continue treatment
- Default Staff/Group - Select from the available list to allocate this action to a particular group or member of staff.
- Default Status - If required, select a default action status to be applied to the message when this action is selected, see Action Status for details.
Note - With the combined Mark Original as Read option, you can simultaneously Action, Mark as Read and Complete.- Mark Original as Read - This marks the message as read when this action is selected.
- Patient specific - By default the patient-specific flag is ticked, this is used to indicate that the result of the action is likely to be an update to the patient record or an encounter with the patient.
- Place in - Depending on the whether you want the Action offered on the initial list or the More list, select either:
- Frequent Actions - Initial list.
- Additional Actions - Accessed from the More list.
- Display Add Action Screen - Ticked by default, remove the tick to stop the Action being offered from Mail Manager.
- Action - Enter the text you require on the Action, for example: