Adding a New Patient
Registering a New Permanent Patient (2.38)
This is step by step guide to adding a new patient to Vision 3:
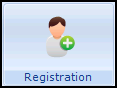
- From the Vision 3 Front Screen, select Registration
 .
Important - Before adding a patient to your system, it is vital you check the patient has not been registered before. The safest way is a date of birth search, see Checking the Register, providing they are not already on the system you should continue. If they have previously been registered, they must be re-registered properly to avoid duplications, see Re-Registration for details.
.
Important - Before adding a patient to your system, it is vital you check the patient has not been registered before. The safest way is a date of birth search, see Checking the Register, providing they are not already on the system you should continue. If they have previously been registered, they must be re-registered properly to avoid duplications, see Re-Registration for details. - Once you are sure, the new patient has not been registered with your practice before, select New Patient
 .
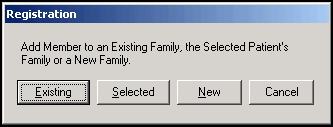
. - The 'Add Member to an existing Family' message displays, select:
- Existing - If the new patient is being added to an existing household, select any member of the household with the same address, see Family Tab for details.
- Selected - If a member of the family you are adding this patient to displays at the top of the screen. Most common when adding a family group or a new baby.
- New - If the patient you are adding has no connection to anyone on your Vision 3 system:
- The Registration - Personal Details screen displays:
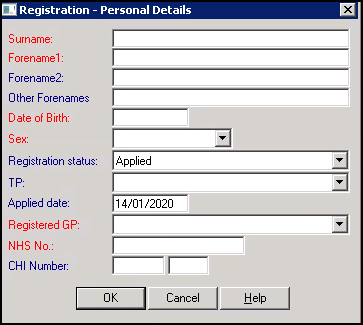
-
Complete as appropriate, items highlighted in red are mandatory, see Registration - Personal Details (initial) for details.
- Select OK and the New Patient Registration message displays:
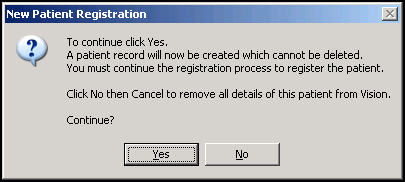
- Select Yes to confirm you are sure you want to create this record, or No to cancel.
- The Registration Card Type screen displays:

- Select the appropriate option(s):
 FP4 medical card
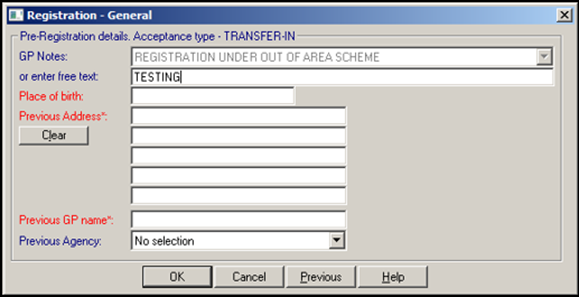
An FP4 is the card issued by your TP. The Registration - General screen displays with Pre-Registration details, Acceptance Type - Transfer-In displaying:
England
Scotland, Wales and Northern Ireland
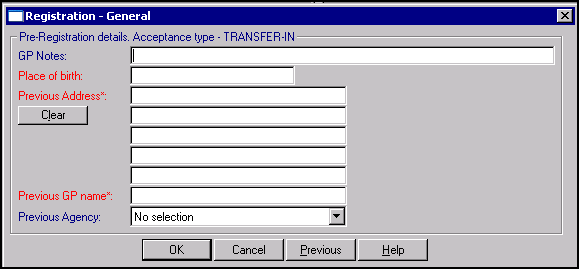
Complete as required, noting entries in red are mandatory:
GP Notes:
England and Wales - Optional, select from the available list or enter free text for additional notes supporting the registration or amendment.
Scotland and Northern Ireland - Optional, free text for additional notes supporting the registration or amendment.
Place of Birth - If the NHS Number is not known and was left blank on the Registration - Personal Details screen, the patient’s place of birth must be entered. If the Place of Birth is not known, enter 'UNKNOWN'. In Scotland, for registration linked practices, the place of birth is included in the Acceptance Transaction.
- Previous Address - New patients should supply their previous address, if this information is not available, you can enter 'UNKNOWN' but it is not recommended.
- Clear - Deletes the text in Previous Address.
- Previous GP name - New patients should supply their previous GP name, if this information is not available, you can enter 'UNKNOWN' but it is not recommended.
- Previous Agency
England and Wales - The following options are available for selection:
England
Wales
Isle of Man
Scotland
Northern Ireland
Ministry of Justice
Defence Services
- Scotland and Northern Ireland - You can select the patient's previous TP if known.Note - If you leave Previous Address or Previous GP blank, the patient is marked as Incomplete RegLinks, see Incomplete Details and Incomplete RegLinks for details.Training Tip - Previous Address, GP and Agency complete automatically if you are adding a patient from a selected or existing family. There is a global option to disable this in Control Panel - File Maintenance.
Select OK to save.
Ex-services with a medical card FP13An FP13 is the card issued when a patient leaves the armed services. The Registration - General screen displays with Pre-Registration details, Acceptance Type - Ex-Services displaying:
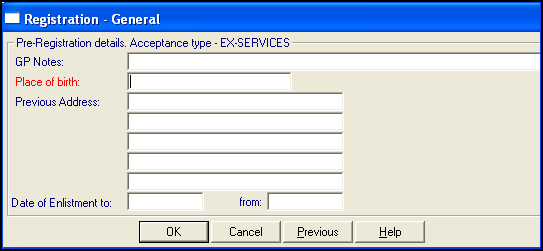
Complete as required, noting entries in red are mandatory:
GP Notes:
England and Wales - Optional, select from the available list or enter free text for additional notes supporting the registration or amendment.
Scotland and Northern Ireland - Optional, free text for additional notes supporting the registration or amendment.
Place of Birth - If the NHS Number is not known and was left blank on the Registration - Personal Details screen, the patient’s place of birth must be entered. If the Place of Birth is not known, enter 'UNKNOWN'. In Scotland, for registration linked practices, the place of birth is included in the Acceptance Transaction.
- Previous Address - New patients should supply their previous address, if this information is not available, you can enter 'UNKNOWN' but it is not recommended.
- Clear - Deletes the text in Previous Address.
- Date of Enlistment to/from - Enter relevant dates
Select OK to save.
Ex-services without a medical cardIf the patient is ex-services but without a FP13 ex-services card, select None of these and then in Does the patient have Dates of Enlistment? enter either:
- Y for yes, if dates of enlistment are available and an Acceptance type - Ex-services displays.
- N for no, if dates of enlistment are not available and an Acceptance Type - Transfer-In displays.
Complete the details as required, remembering that items highlighted in red are mandatory
Select OK to save.
FP58 pink baby cardAll babies are issued with NHS numbers as part of the standard format notification of birth. The NHS number is put on any documentation related to the baby, for example, the ante-natal record, Guthrie tests, the parent-held child record and any discharge summaries that the hospital produces. The child health department notifies the Registrar of the birth and NHS number.
To register a baby, select FP58 pink baby card and then in Was the patient born in England or Wales? enter either:
Y for yes and an Acceptance Type - Birth screen displays.
N for no and an Acceptance Type - 1st Acceptance displays, you must enter a Place of Birth.
Select OK to save.
None of theseSee Registering a Permanent Patients with No Medical Card for details.
- The Registration Details - Personal tab displays, most personal information completes automatically but you can add any further information as required, for example, Title, Marital Status.
- If not completed, select Add to enter patient's Main Address, see Adding and Maintaining Patient Addresses for details.
Note - The address may already be completed by default if you are adding the patient to an Existing or Selected family.
Contact numbers are also recorded here, see Adding and Maintaining Contact Numbers for details. Select Next.
- Now complete the following tabs selecting Next once you are finished with each one:
- Registration - Select a Usual GP. The Usual GP is the doctor the patient usually sees and can be different from the Registered GP, but if in doubt, simply select the Registered GP, see Registration Tab for full details.Important - A Usual GP must be selected or no shared care consultations that the patient has will upload to Vision 3. Once a Usual GP is selected, any stuck consultations automatically upload when a shared care clinician logs into their device.
- Notes - Enter any free text comments of an administrative nature, contact notes or confidential notes if required, see Notes Tab for full details.
- Other - Record details of rural mileage, residential institutes, household rank, medical insurance, dispensing, prescription charge exemptions, notes kept at, see Other Tab for full details.
- Ids - Add any hospital numbers or other reference numbers associated with the patient, see Ids Tab for full details.
- Family - Displays details of any other members of the same household, see Family Tab for full details.
- Consent - Depending on your country and settings, various consents are set from this screen, see Consent Tab for full details.
- Online Services - Complete to enable your patient to access any online services you offer, see Online Services Tab for full details.
- Preferences - Displays quick add options for various useful records, see Preferences Tab for full details.
- Registration - Select a Usual GP. The Usual GP is the doctor the patient usually sees and can be different from the Registered GP, but if in doubt, simply select the Registered GP, see Registration Tab for full details.
- Check the Incomplete Details and Incomplete RegLinks indicators at the top if the screen, if:
- Incomplete Details has a tick, you have missed out some mandatory information, select Action - Acceptance and run through the screens again checking for and completing any red entries.
- Incomplete RegLinks has a tick, you have completed enough information for Registration Links, this is usually a missing NHS Number:
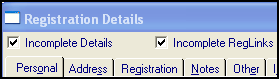 See Incomplete Details and Incomplete RegLinks for further details.
- Select OK to save.
- If the patient has incomplete details, a warning displays, select:
- Yes to continue, or
- No to return to the registration screen and complete any missing information.
Providing the Incomplete RegLinks tick clears before you selected OK, the patient's registration record is "frozen" (if you are Registration Links) and you cannot update their Registration details until they are accepted via the Registration Links process.