Adding a Footer Control
Some data entry screens in Vision+ allow you to quickly record measurements and values without having to select a clinical term; however, you cannot record any freetext comments. They include such items as:
- Blood Pressures
- Smoking
- BMI
- Some test results
Creating a clinical term footer control allows you to set a comments box to display below the data entry screen when recording data on a template. The example below shows how to add a clinical term footer control to a Blood Pressure row.
Note - If you select a measurement or value box from the alert pop-up screen you do not get the opportunity to add comments, this option is only available when adding data via a Vision+ Template.
Adding a Blood Pressure Row to a Template with a footer control
To add a Blood Pressure Row to a Template with a footer control:
- On the Home tab, select Add Blood Pressure Row
 from the Controls area of the toolbar.
 - A blood pressure row displays on the template.

- Select the Layout tab and select the Footer Code button.

- Enter a search term in the code search box and select Search. A list of clinical terms displays on the left hand side of the screen. Highlight the term for Blood pressure reading and select
 to move this clinical term to right hand side of the screen.
- Select OK to save and exit.
Viewing the Footer Control in Consultation Manager
To view the footer control in Consultation Manager:
- In Consultation Manager, select a patient.
- From the Windows Notification Area, right click Vision+
 and select Clinical Templates:
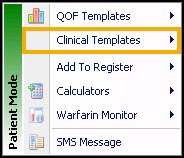
- Choose the template that has the new Blood pressure row with a footer control attached.
- To record both the patient's blood pressure and freetext comments, type your notes in the clinical term footer box. Select Save and Close and you are automatically prompted to enter the patient's blood pressure reading. Note - You do not need to select BP, as the footer box is automatically attached to the clinical term you assigned when setting up the footer.
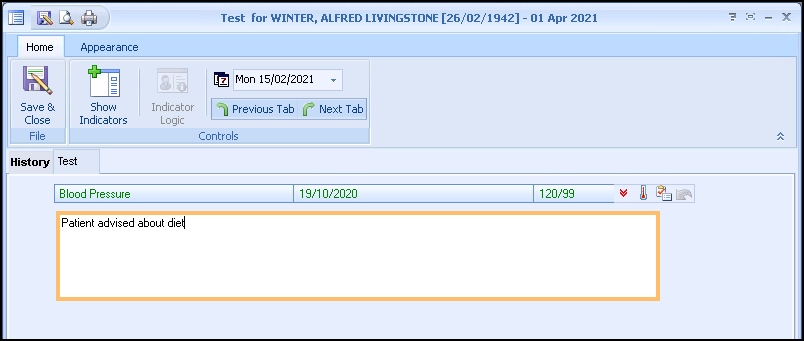
- Select Save and Close.
Note – To print this topic select Print  in the top right corner and follow the on-screen prompts.