FAQs
 Navigating Appointments
-
 Day View - a day-by-day view of all booked and available appointment slots.
 -
 Calendar View - a week view of available slots only.
 -
 Dashboard - a snapshot of appointment activity across your entire practice for the current day.
 -
 Patient Details - patient appointment record displaying demographics, appointment details and recall information for the selected patient.
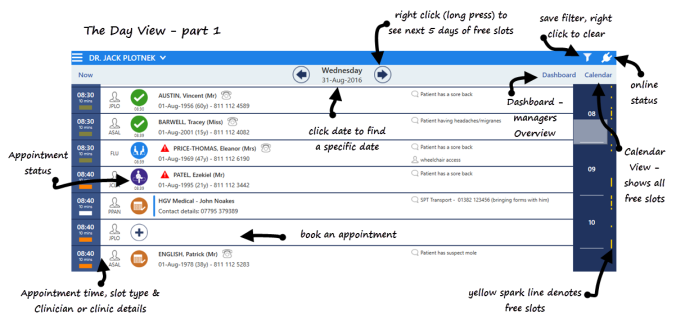
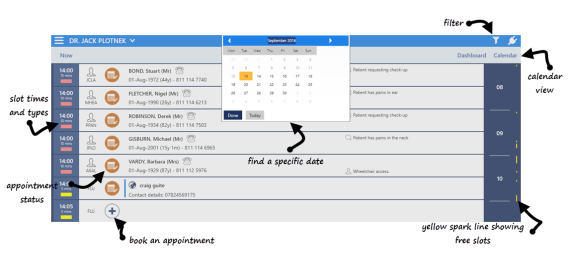
When you open the Appointments app the Day View is initially displayed. From here you can use your mouse and keyboard or touch screen gestures to move around the screen. You can move around by:
- Scrolling up and down the Day View to see today's appointments in a time line.
- Selecting the yellow spark line to the right of the screen to go straight to a free slot at a specific time of the day.
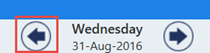
- Selecting the arrows either side of the Date to move forward or back a day at a time.
- Right clicking on the arrow to the side of the date to move forward to a date within the next 5 days.
- Click on the date in the Day View to open a calendar to choose a specific date to navigate to.
- Select the Calendar or Dashboard View buttons.
- Just start typing the patients name anywhere on the screen to select a patient and open the Patient View.
- See also quick start screens.
From Day View
- Day View to Calendar View - Select
- Day View to Dashboard - Select
Back To Day View
- Calendar View to today on the Day View - If you are in the current week, press today’s date to return to Day view.
- Dashboard to Day View - Simply select
 .
.
Yes, the Appointments app works with Windows 8.1 which means you can operate the app via either a keyboard and mouse or using the following basic touch screen gestures:
- Press and hold does the same thing as right-clicking. Touch the screen where you want to right-click, hold until a complete circle appears, and then lift your finger.
- Flick your finger to scroll up and down or left and right. For example, an upward flick moves a page down, and a downward flick moves a page up.
- Other touch screen gestures can be found here.
To navigate back to the Day View when you are within the current week on Calendar View, select today's date at the top of the screen. e.g.

If you have navigated further forward in the Calendar View:
- Select the
 Hamburger button which opens a toolbar at the top left of the screen.
 - Select Today , then the date button which takes you back to the Day View.
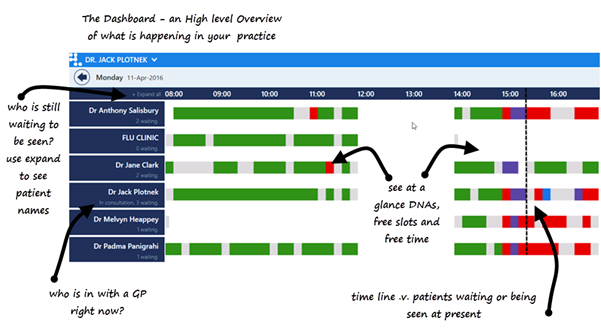
To see a high level overview of everything that is happening at your practice on a day-to-day basis you can access the Dashboard. Select the Dashboard View button from the top right corner of the Day View. It shows you:
- Clinicians and Clinics (defaulting to whatever date you are on in Day View)
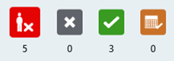
- Breakdown of slots into Seen, DNA, Waiting, In Consultation, Arrived and free appointments
- Names of patients waiting and in consultation with a specific clinician or clinic
We have designed the new Appointments app with user experience as the number 1 priority. We do understand that the transition from the old appointments module may take some getting used to. Please see the task comparison document which addresses common queries for moving to the new Appointments app.
 AppointmentsToday
To mark a patient as arrived, from the Day View or Patient View, simply press the  Booked appointment status on the booking for the relevant patient. This changes the status to
  Arrived.
You can also right click or long press on the appointment and change the status by selecting one of the following:
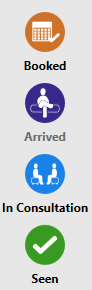
Right click or long press on the appointment and select  Booked from the list:
Booking Appointments
Using the  Filter button, you can filter within the Day or Calendar View by clinicians, clinics, slot types, gender and languages. Your selections can then be saved for quick use next time.
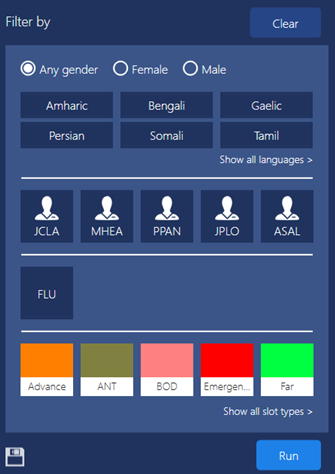
1. Select Filter at the top right of the screen.
2. Select from the following options:
- Gender
- Language
- Clinician
- Clinics
- Slot type
(the selected options are highlighted and ticked)
3. Select  Run. The appointments are displayed according to your selected options.
4. Press  Save and enter the Filter Name to use your selected Filter again.
More on this topic...
When a Filter is applied to a view, the Filter button changes to orange  . To clear, press Filter and select Clear. You can then re-select your search options.
Right click on Filter to display:
- Saved filters, which you can choose to run
- Option to Clear all of the Filters
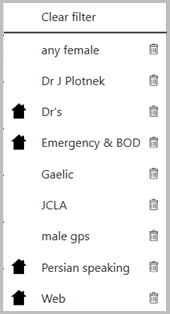
For more information on filtering of spoken languages see How do I change my practice and personal settings in appointments?
- Right click on the Filter button.
- Select the
 Delete button next to the filter you wish to remove.
 - Confirm deletion.
From the initial screen, known as Day View, find an available appointment by either:
- Scrolling down the screen until you find a free slot
- Selecting the time line next to the spark line on the right hand side of the screen to take you to a free slot later in the day
- Selecting the filter to search for a specific clinician and/or slot type
- Right clicking on the arrow to the right of the date to see the next 5 days and a count of free appointments
- Selecting the Calendar View to see a week's worth of free slots
- Clicking on the date at the top of Day View allows you to navigate to a specific date
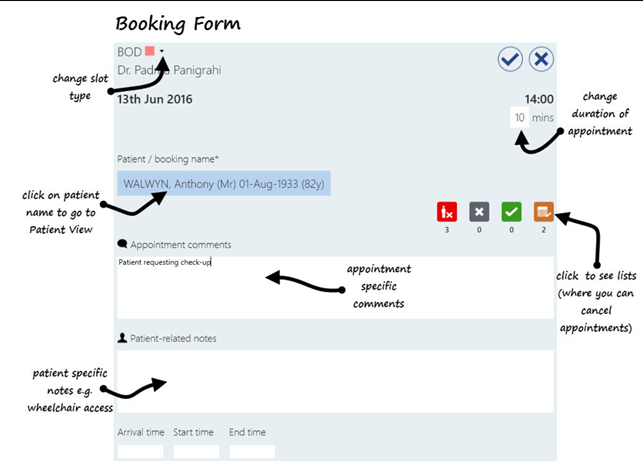
Once you have found a free slot, you can book an appointment as follows:
- Click/touch anywhere on the free slot or
 Add if you are in the Day View, or select any slot in the CalendarView.
 - Once selected, the appointment slot is
 locked to other users whilst you select your patient.
 - Enter the patients Surname and / or Date of Birth into the Appointment title box of the booking form and select
 search. For a list of specific searching options press
  on the booking form.
 - Select the patient from the matches displayed (check the tick box to include inactive patients in your search. his is a user specific setting that remains until changed)
- Enter information if required into the Appointment Comments box (e.g. the reason for appointment).
- Enter information if required into the Patient-related notes box (e.g. Deaf, wheelchair access required).
- Press
 Save.
Save.
To make an appointment for someone who has not yet registered:
- Find a free slot and press Add.
-
Enter the patients Surname and/or Date of Birth into the Appointment title box of the booking form and press
Search in case they have been seen at your practice before (check the tick box to include inactive patients in your search). - If the patient is not found press the back arrow and return to the Booking Form.
- Type the patients name into the Appointment title on the booking form. It is advised to type (temporary patient) for example after their name.
- Then add contact details and the reason for the appointment.
- Press Save .
To search for a special booking already made see How do I search for a booked special booking?
When booking an appointment in the Day View, if your patient already has an appointment booked for today the booking form displays a warning saying "Patient already has an appointment on this date". Your options from the booking form are:
- Press X to ignore the prompt and continue to make the appointment.
- Check the appointment that is already booked, by selecting the
 future appointment button . A list of the future appointments are displayed:
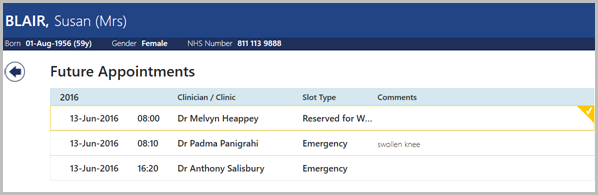
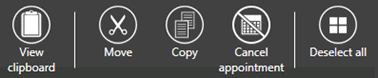
If you right click on one of the appointments you have the following toolbar options:
-
• View Clipboard
-
• Change Status
-
• Move
-
• Copy
-
• Cancel Appointment
-
• De-select All
If you wish to cancel one of the future appointments:
- Select the appointment you wish to cancel.
- Press the Cancel appointment button.
- Select the cancellation reason from the drop down list.
- Click Save.
- To return to the booking form click the back arrow.
From anywhere on the Day or Calendar View:
- Start typing the patients name, and the search box will appear.(missing or bad snippet).
- Click into the drop down list and choose special bookings
 . the search bar changes
- Click on search
 .
. - Find the patient and click to select.
- The booking form for the special booking opens. Click Save or Cancel to close.
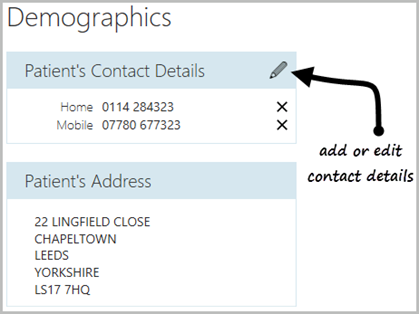
Once you have selected the appointment you want to book and searched for your patient, the patient booking form opens. From here you access the selected patients Patient View:
- Select the name in the Patient/booking name box.
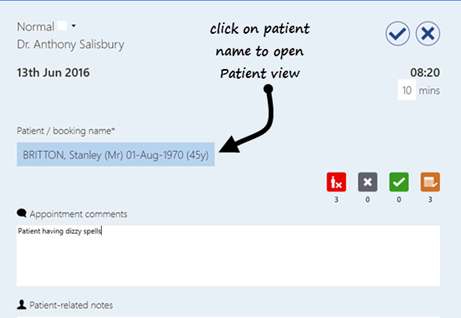
- The Patient View is displayed - press the
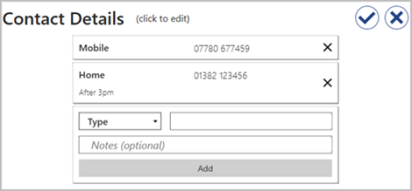
 Edit button in the Patient's Contact Details header.
 - Select the type of contact - add the number into the highlighted box.
- PressAdd.
- Press Save.
- Press the back arrow to return to the booking form.
You can search in the following formats for a patient:
- Surname
- Surname, Forename
- Surname date of birth (full or partial)
- Date of Birth Full
- Surname, forename date of birth (full or partial)
The full date of birth can be typed as:
- DDMMYYYY (e.g. 09121980)
- DDMMMYYYY (e.g. 09DEC1980)
The partial date of birth can be typed as:
- YYYY (1980)
- MMYYYY (091980)
- MMMYYYY (DEC1980)
 is displayed.
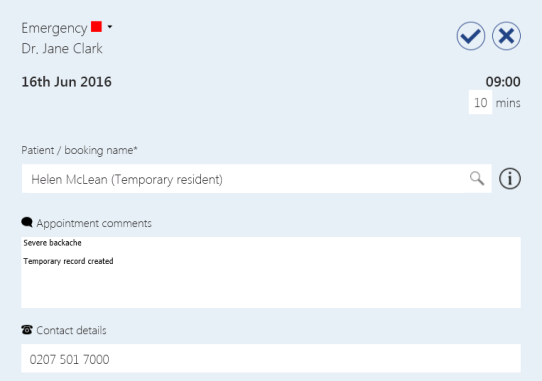
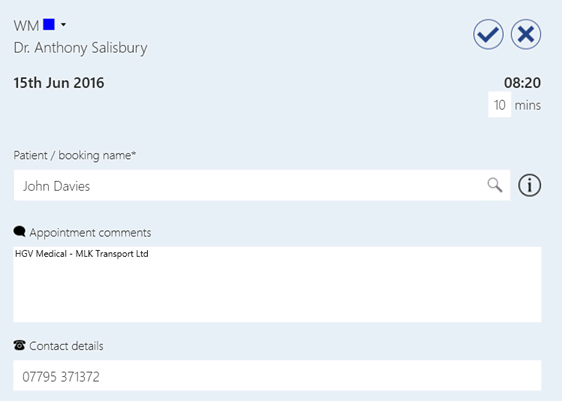
To make a special booking for a patient who is not registered at your practice (e.g. Medical for HGV) you must:
- Select Add if you are in the Day View, or select any slot in the Calendar View.
- Enter the patients Surname and/or Date of Birth into the Appointment title box of the booking form and press Search in case they have been seen at your practice before (check the tick box to include inactive patients in your search).
- If the patient is not found press the back arrow and return to the Booking Form.
- Enter the Patient name (or if no name the booking name e.g. HGV medical) into Patient/booking name* box.
- Enter the reason for appointment into the Appointments comments box.
- Enter the patients phone number into the Contact details box.
- Press Save.
- The Day View displays special bookings with a blue line between the patient name and the appointment status:
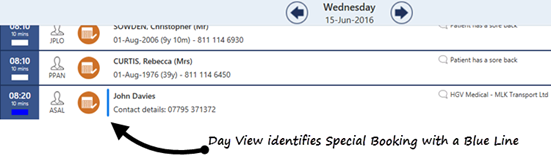
A special booking is identified with a blue line between the patient name and the appointment status in Day View.
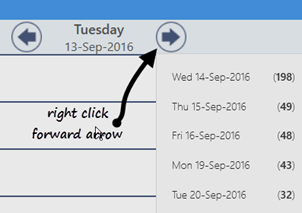
To view the next 5 days free appointment availability by count:
- Right click (or Long Press if using touch screen) on the
 arrow to the right of the date at the top of the screen. The menu displays the next five days and how many free slots are left on each day.
 - Select on the date you want to navigate to.
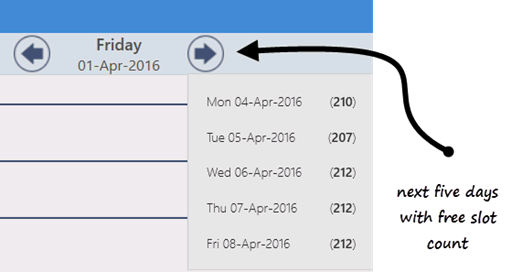
- The Day View for the selected date is displayed. You can now book an appropriate appointment.
-
Note - The right click counts the clinicians, clinics or slot types set in your Filter. For example if you have your filter set to Dr Jones all slot types, it displays a count of all of Dr Jones' free slots in the next five days.
The Calendar View is accessed from the top right corner of the Day View and displays the free slots for the current week. To view future weeks either:
- Select on the
 arrow on the time line at the top of the screen to extend the time line forward another week.
 - Right clicking on the same arrow allows you to select from future date ranges (depending on how far you have extended your books):

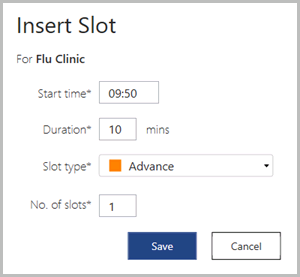
To insert an additional slot into the Day or Calendar View you can either:
- Right click (or long press if using a touch screen) then select
 Insert Slot .
 - The Insert Slot screen displays the following options:
- Start Time - Change as required
- Duration - Change as required
- Slot Type - Choose from the list
- Number of Slots - Default is 1
- Press Save.
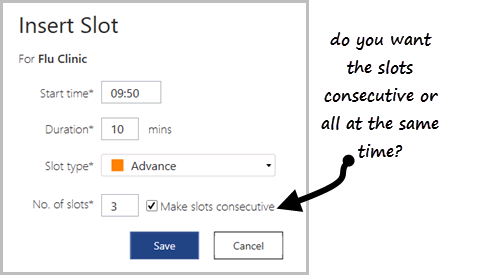
- Right click (or long press if using a touch screen) then select Insert Slot .
- The Insert Slot screen offers the following options:
- Start Time - Change as required
- Duration - Change as required
- Slot Type - Select from the list
- Number of Slots - Enter required number (eg 6 slots for an hour of 10 minute appointments)
- Select Make Slots Consecutive to insert the slots one after the other (e.g. 3 additional emergency slots)
- Deselect Make Slots Consecutive inserts the slots all the same time (e.g. Flu Clinic where you have multiple clinicians seeing patients at the same time).
- Press Save.
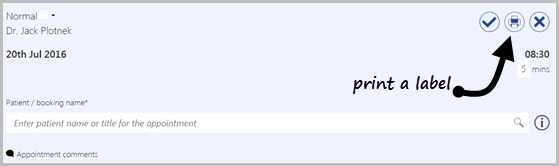
If you are at a practice that already has a LabelTrace printer set up as "Vision_Appointment", you can print an appointment label from the Day View.
When the booking form is open you have an additional Print Label button:
You can change the slot type in Day View for multiple appointments, for example, making more emergency appointments following a Bank Holiday. To do this:
- Right click on each appointment you want to change - they will be highlighted and ticked.
- A "XX items selected"
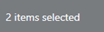 prompt appears at the bottom of the screen above the right click toolbar options to inform you of how many items you have selected to change.
 - Select change type
 from the floating toolbar.
 - Choose the slot type, for example Emergency from the picking list (The slot types automatically update and change to Emergency).
You can change the slot type in Calendar View for multiple appointments, for example, making more emergency appointments following a Bank Holiday. To do this:
- Right click on each appointment you want to change - they will be highlighted and ticked.
- A "XX items selected" prompt appears at the bottom of the screen above the right click toolbar options to inform you of how many items you have selected to change.
- Select change type from the floating toolbar.
- Choose the slot type, for example Emergency from the picking list (The slot types automatically update and change to Emergency).
Patient Related Appointments Tasks
From anywhere in the Day or Calendar Views you can search for a patient who has a query regarding their appointments bookings.
- Start typing the patients Surname and / or Date of Birth and a search bar automatically appears at the top of the screen. For a list of specific searching options either click on the search toolbar.

- Select your patient from the matching patients displayed (check the tick box to include inactive patients in your search).
-
The Patient View now displays your selected patient, and from here you can view:
-
 Missed Appointments
  Cancelled Appointments
-
 Completed Appointments
-
 Future Appointments
-
Contact Details - Next of Kin, Carers and any patients the selected patient cares for.
-
Demographic Details - Contact details, address, basic registration details and any appointment notes.
-
Recalls - Outstanding recalls
-
If the patient needs to amend a future appointment, from the Patient View screen right click on the appointment and choose from the following options:
You can do this from the Patient View.
- To access the Patient View, type the patients name anywhere on the screen, and select the patient from the displayed list.
- Select the Edit Patient Details button.
- The Contacts details display the following in view only format (this can only be updated from Vision 3 at the moment.)
- Patients Next of kin
- Any Carers the patient has
- Any patients Cared for by the patient
You can do this from the Patient View.
- To access the Patient View, type the patients name anywhere on the screen, and select the patient from the displayed list.
- Select the Edit Patient Details button.
- Make changes as required.
- Press Save and return to Patient View.
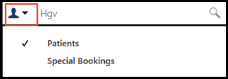
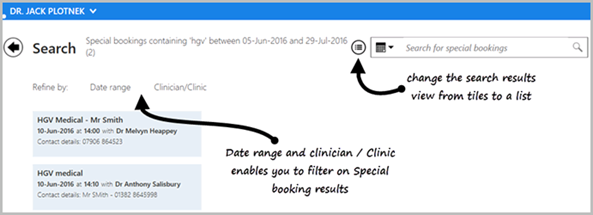
- Start typing a Surname or anything that has been entered into the Patient/booking form box (eg Smith or HGV) anywhere on a screen.
- In the search bar a drop down list displays with options for Patients or Special Bookings - choose Special Bookings.
- Click Search.

- Select your patient from the matching patients displayed - the patient booking form opens for updating.
Changing the duration of an appointment time can be done whilst making an appointment or even after an appointment has been booked. To do this:
- Click on Add in the Day View or any slot within Calendar View.
- Enter the patients Surname and / or Date of Birth into the Appointment title box of the booking form that opens and click search.
- Select the patient from the matches displayed (check the tick box to include inactive patients in your search - this is a user specific setting that remains until changed).
- Change the duration of the appointment slot. You may see a message stating that the appointment conflicts with another appointment. Click X to this message.
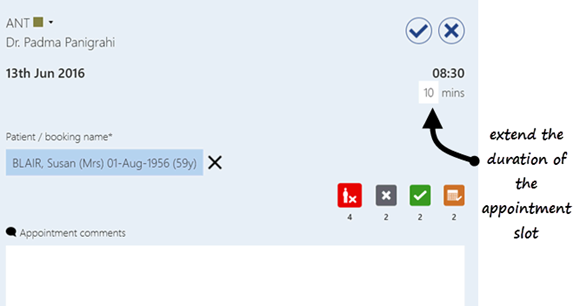
- Click
Save.
- The extended appointment can be seen on the Day View with the extended appointment time scored through as follows:

The Patient View displays an overview of the patient’s appointments history and future bookings:
- Start typing a Surname or Date of birth from any screen and a Patient Search function is displayed. (see on the search toolbar for a list of search formats).
- Select your patient from the matching patients displayed (active patients are bold, inactive are greyed out)
-
The Patient View now displays your selected patient, and from here you can view:
-
Missed Appointments
- Cancelled Appointments
-
Completed Appointments
-
Future Appointments
-
Contact Details - Next of Kin, Carers and any patients the selected patient cares for.
-
Demographic Details - Contact details, address, basic registration details and any appointment notes.
-
Recalls - Outstanding recalls
-
You can perform the following functions in Patient View:
- Right click a booked appointment to cancel the appointment.
- Right click a booked appointment to Move or Copy to the clipboard.
- Right click a DNA appointment to Move or Copy this appointment to the clipboard (this is not possible if the appointment is more than 7 days in the past).
- Select next to Appointments Header to make another appointment.
- Select the arrow at the top left of the screen takes the user back to the screen which they came from.
- Click on the pen icon next to Contact Details or Patient Notes to add or edit.
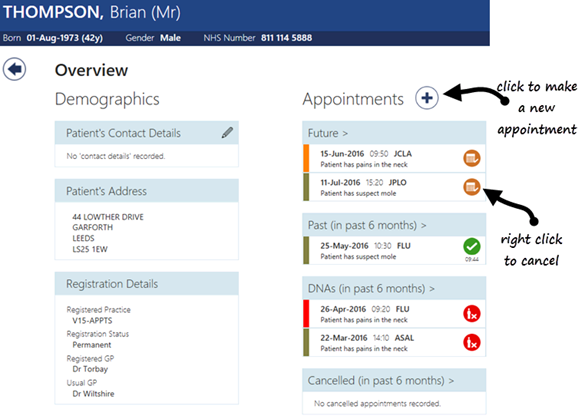
The Patient View is particularly useful if a patient has a query. From here you can confirm details of an existing appointment, cancel, move or copy it as well as making a new appointment. To do this:
- Start typing a Surname or Date of birth from any screen and a Patient Search function is displayed.
- For a list of specific searching options click on in the search toolbar.
- Select your patient from the matching patients displayed (active patients are bold, inactive are greyed out)
- From the Patient View click Add Appointment.
- The Day View is displayed with a selected patient message box containing Patient Name, location and registered GP details.
- Select an appointment and the patient details are automatically populated into the booking form.
- Add any relevant appointment comments and patient related notes as required then press Save .

Moving and Cancelling Appointments
To move an appointment from the Day or Patient View:
- Right click (or long press if using touch screen) on the appointment you want to move.
- Select
 Move.
Move. - Find the appointment you want to move your patient to and right click.
- Select on
 View clipboard and all of the moved patients on the clipboard are displayed.
 - Select your patient from the Marked for Move section of the clipboard, your patient and all the associated comments are automatically moved to the new date and time.

To cancel an appointment in the Day, or Patient View:
- Right click on the appointment you want to cancel.
- Select
 Cancel .
 - Select a Cancellation reason from the drop down list.
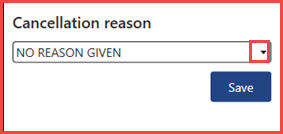
- Click Save.
You may need to hold appointment slots and this can be done by:
- Right click (or Long Press if using touch screen) to highlight an appointment slot or slots.
- Select
 Hold Slot .
 - The appointment status icon changes from Add to
 Held .
To release Held Slots:
- Right Click (or Long Press for touch screen) on the Held slots.
- Select
 Release Slot.
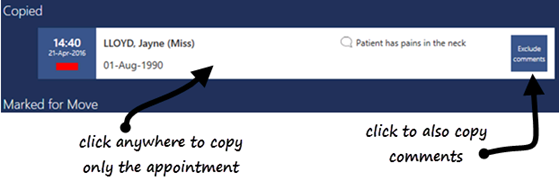
To make a quick appointment for a patient you can copy their existing appointments from the Day or Patient View, rather than having to select the patient again. To do this:
- Right click (or long press is using touch screen) over the appointment and select
 Copy .
 - Select the slot you want to copy the appointment too then right click on it and select View Clipboard .
- The clipboard displays Copied Appointments above Marked for Move. You have two options:
- Select the patient anywhere on the appointment and the patient is automatically copied into the new appointment. (e.g. recurring appointment for a dressing change).
- Select the patient by clicking on the Exclude comments box to copy the appointment and the previous comments into the new appointment. (e.g. patient needing multiple appointment for different reasons).
Troubleshooting
If you cannot see appointment slots past a specific date it will be because your appointment books have not been extended that far ahead. Please see your appointments administrator at your practice for further information.
The appointments app allows you to filter your view. If your Filter button is orange like this: it means you have a filtered view applied and you are only viewing specific slots. To clear the filter:
- Click on Filter and either press Clear the filter or re-select the clinicians and / or slot types you wish to search on.
- Click Run to run and filter the View or Save to use it again.
![]()
The Appointments app relies on an internet connection and a back end function called message bus to write data back.
The workstation you are using has an N3 connection to the internet which is very reliable. At the top right of the screen is a status button. When the status is white  you are connected to the internet , when it has a red cross
  , the internet connection has been lost for some reason. A message appears saying "Something went wrong - the app has gone offline. You can still use it to view information, but no changes will be saved".
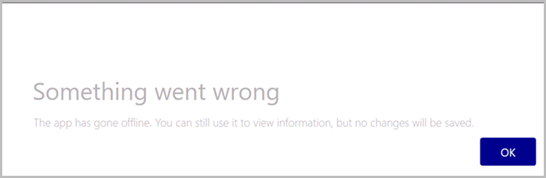
You can continue to view the appointments app but no changes are saved.
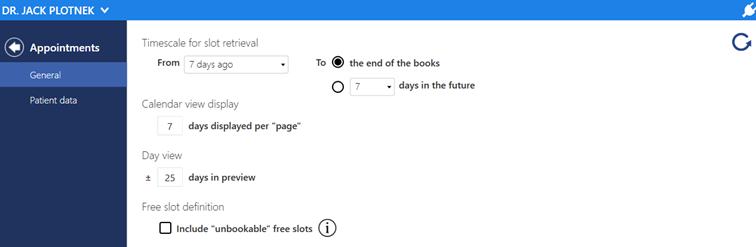
If you have full access rights you can set up the following:
- From your name at the top left of the appointments screen, click the arrow and select Preferences from the drop down list (the General Tab is the default screen to open).
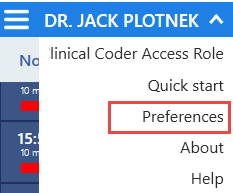
- The following options are available within the General Tab:
- To - A practice wide setting to select between "To the end of the books" and a time scale of 7 - 42 "days in the future". You have the option of deciding how far forward you want the books to display.
Timescale for slot retrieval
From - A practice wide setting to select a date range from the drop down list of up to 7 days ago, to set how far in the past the back arrow on Day View will display.
Calendar view display
A user specific setting that sets how many days are displayed per page of your Calendar View.
Note: If you are scrolling back and forth too much you could reduce the days displayed, or if you are in a small practice with only a couple of staff you could choose to view more days per page.
Day View
A user specific setting that sets how many days are shown when you right click the forward arrow in Day View.
Free slot definition
- Select the tick box to include free slots with a slot type that cannot be booked on the current day.
- Once you have set your preferences in the Patient Data tab, navigate back to the previous screen by clicking
 .
. - If you want to undo what you have set on the General tab click the
 reset button .
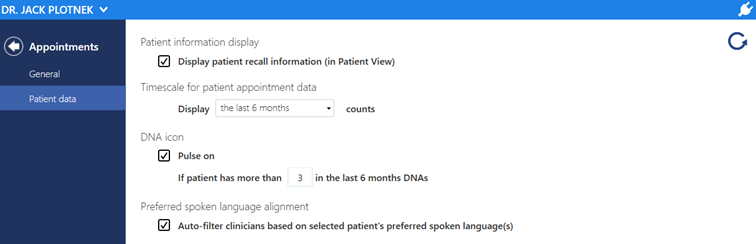
The Patient data screen has the following practice wide setting options:
Patient Information display
Select to display patient recall information in the Patient View.
Timescale for patient appointment data
Choose from a drop down list of options from the last 3 months up to the last 5 years, on how much appointment history data in the form of counts displayed in the patient information (Patient View and Booking Form).
DNA icon
Activate and decide how many appointments a patient DNA's before the DNA icon pulses in the Booking Form.
Preferred spoken Language
- When selected, sets the filter selections to the spoken language preference of the selected patient when an appointment is made by clicking
 in Appointments in Patient View.
 - Once you have set your preferences in the Patient Data tab, navigate back to the previous screen by clicking .
- If you want to undo what you have set on the Patient Data tab click the reset button .