
FAQs
 Navigating Appointments
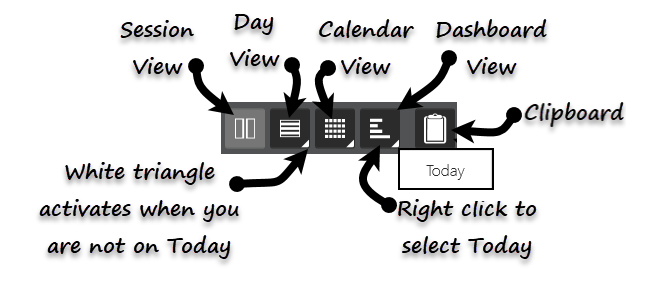
- Session view - A detailed view of all the clinician's appointments by session.
See - Session View. - Day view - A view of all booked and available appointment slots grouped by time.
See - Day View. - Calendar view - A view of available slots only.
See - Calendar View - Overview. - Dashboard - A high level view of appointment activity across your entire practice for a day.
See - Dashboard View. - Patient view - Displays demographics, appointment details and recall information for the selected patient.
See - Patient View - Overview.
The View menu gives access to the different views, click on a button to open the selected view on the current selected date.
If you have navigated away from today, a white triangle displays on the view button. Right click on the required view button and select today to open the Appointment view on today's date.
See - Appointment Views.
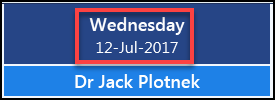
To navigate back to the Session view select a date at from the dark blue bar.
See - Appointment Views.
To see a high level overview of activity at your practice on a day-to-day basis you can access the Dashboard.
For a more detailed view, access the Session view.
See - Dashboard View and Session View.
We are developing a suite of free Vision training courses to help you become an expert user in our exciting new apps.
The interactive courses are delivered via the Vision eLearning Hub where you can access your allocated courses, track your progress, view your achievement record and print off your accreditation certificate.
To register for the Vision e Learning Hub please click eLearning.
 Appointments Today
To mark a patient as arrived, from the Session, Day or Patient view, simply press the Booked  appointment status on the booking for the relevant patient. This changes the status to Arrived
  .
.
See - Checking a Patient in on Arrival.
Right click on the appointment and select Booked  from the list:
Booking Appointments
Using the Filter  button, you can filter within the Session, Day or Calendar View by clinicians, clinics, slot types, gender and languages. Your selections can then be saved for quick use next time.
See - Applying Filters.
When a filter is applied to a view, the Filter button changes to orange  .
.
Hover over the Filter button to see the filter details.
To clear, select Filter and then select Clear.
See - Applying Filters and Clear Filters.
Select the Quick Search  button, to return free slots across a selection of clinicians.
See - Quick Search.
- Click anywhere on the free slot or the Add
 button if you are in the Day or Session view. From the Calendar view select any slot.
 - Search for the patient. See - Patient Search Criteria.
- Select the patient.
- Select the Save
 button.
See - Making an Appointment.
Yes - you can make an appointment for someone who is not registered.
See - Making a Special Booking.
When booking an appointment in the Session, Calendar or Day view, if your patient already has an appointment booked for today the booking form displays a warning saying "Patient already has an appointment on this date".
See - Pop Up Warnings.
You can search by Surname, forename and date of birth combinations.
See - Patient Search Criteria.
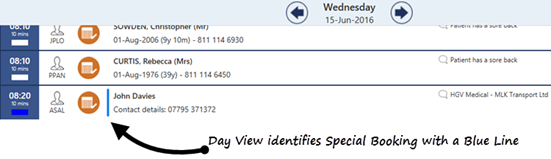
A special booking is identified with a blue line between the patient name and the appointment status in Session or Day view.
Yes - you can insert an additional slot(s) into the Session, Day or Calendar view.
See - Insert Slots
Yes - you can print an appointment label from the Session or Day view.
See - Print an Appointment Label.
Yes - you can change the slot type in Session, Calendar and Day views for single or multiple appointments. The slot type can also be changed in the booking form.
See - Change Slot Types and Making an Appointment.
Patient Related Appointments Tasks
- Start typing the patients Surname and / or Date of Birth, a search bar automatically displays at the top of the screen.

- Select the Search
 button.
 - Select your patient from the list.
-
The Patient View displays your selected patient, including the appointment history.
If the patient needs to amend a future appointment, right click on the appointment and choose from the following options:
See - Patient Search Criteria, Accessing Patient View and Patient View - Overview.
The Patient View includes next of kin and carer information.
- Start typing the patients name Surname and / or Date of Birth, a search bar automatically displays at the top of the screen.
-
Select the Search button.
- Select the patient from the list.
- The Contacts details display.
- Patients Next of kin
- Any Carers the patient has
- Any patients Cared for by the patient
Note - Contact details are view only and cannot be amended in the Appointments app. To amend patient details, please go to the Registration or Consultation Manager Vision 3 modules.
See - Accessing Patient View and Patient View - Overview.
Changing the duration of an appointment time can be done from the booking form, whilst making an appointment or after an appointment has been booked.
See - Change the Duration of an Appointment and Making an Appointment.
Moving and Cancelling Appointments
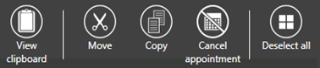
To move an appointment from the Day or Session View, you can simply drag and drop the appointment into a new slot or the clipboard.
See - Moving Appointments.
- Right click on the appointment you want to cancel.
- Select the Cancel
 button.
 - Choose a Cancellation reason from the drop down list.
- Click Save.
See - Cancelling an Appointment.
Yes - users with Administration rights can hold and release slots.
See - Holding Slots .
To copy an appointment from the Day or Session view:
- Right click on the slot(s).
- Select the Copy
 button from the toolbar.
The Appointment is copied to the clipboard. - Select the Clipboard
 button.
 - Find a free slot, you can simply drag and drop the appointment into the new slot from the clipboard.
See - Copying Appointments .
Troubleshooting
If you cannot see appointment slots past a specific date it will be because your appointment books have not been extended that far ahead. Please see your appointments administrator at your practice for further information.
The appointments app allows you to filter your view.
If your Filter button is orange it means you have a filtered view applied and you are only viewing specific slots.
See - Clear Filters.
The Appointments app relies on an internet connection.
When the status is green  you are connected to the internet, when it has a red cross
  , the internet connection has been lost.
A message appears saying "Something went wrong - the app has gone offline. You can still use it to view information, but no changes will be saved".
These settings can be changed in the preferences settings.
See - Preferences - General and Preferences - Patient Data.

