
Adding an eMED3
To add an eMED3:
- Select the appropriate patient and open an Encounter with the appropriate consultation type, see Selecting a Patient and Adding an Encounter if required.
- In the dynamic search bar, type 'e':
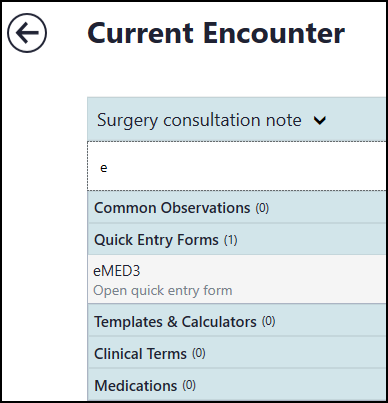
- The smart list displays with all your available options, select eMED3 and the eMED3 Doctor's Statement displays.
- If the patient has had an eMED3 issued on their record in the last 12 months, the Use existing eMED3 details screen displays. Select:
- Use eMED3 to create a follow on eMED3, or
- Don't use to start a new, unrelated eMED3.
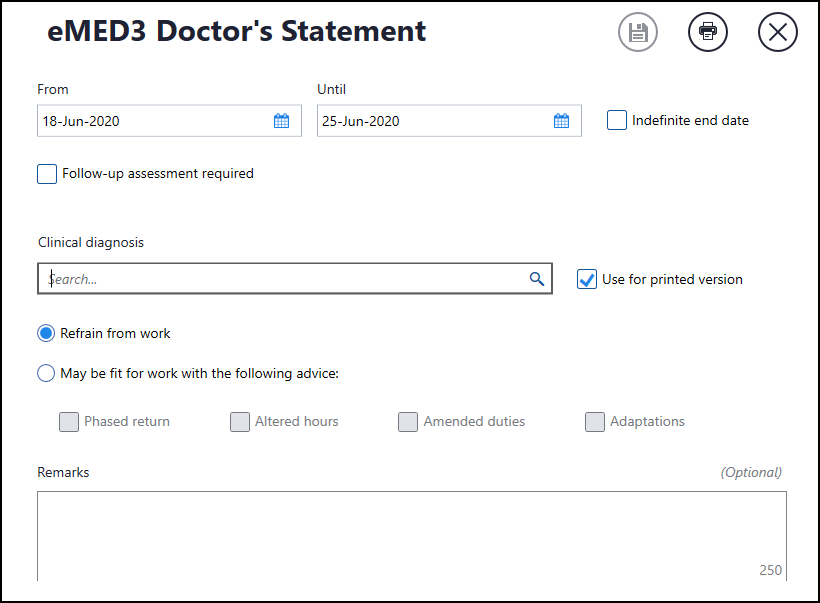
- Complete the eMED3 Doctor's Statement as appropriate:
- From - Defaults to today's date. Change to back date the statement if required, please be aware you cannot enter a date in the future.
- Until - Defaults to seven days, update as required, with either a full date or a shortcut, for example 2w for 2 weeks and 1m for 1 month, or
- Indefinite end date - Tick to leave the Until date open ended.
- Follow-up assessment required - Tick to record if a follow-up appointment is required:
- Follow-up assessment - Displays if you tick Follow-up assessment required, enter a date for the follow-up.
- Clinical diagnosis:
- If you have already entered a Diagnosis or Procedure SNOMED CT term in the current encounter, this is automatically populated. You can remove and replace with an alternative term if required.
- If no clinical code is present, or more than one clinical code is recorded in this encounter, search for and add the clinical diagnosis in the usual way, see Adding Clinical Data if required.
- Use for printed version:
- Ticked by default, the Clinical diagnosis prints on the statement.
- Remove the tick to display Clinical diagnosis (printed version only), enter a free text reason to print on the statement.
- Refrain from work - Selected by default, this automatically deselects if you choose May be fit for work with the following advice:.
- May be fit for work with the following advice - If one of the following applies, select from:
- Phased return
- Altered hours
- Amended duties
- Adaptations
- Remarks - Mandatory if you select May be fit for work with the following advice, enter advice as required.
- Issued by hand - Tick if you have manually completed a MED3 and are just recording it here.
- Private patient/certificate - Tick if this is a private patient or you are issuing a private MED3.
- Requested by - Optional, defaults to Patient, select from the available list if required.
- Circumstances - Optional, select from the available options if required.
- Additional notes - Optional, enter any other comments required.
- Date - Defaults to today's date.
- Clinician - Defaults to the clinician logged in or if you are not a clinician, the Usual GP.
Shared Care Setting only - eMED3 Statements can currently only be created, edited and printed by clinicians who have a GMC code, if your GMC code is not available in Vision Anywhere, the GMC Code section displays. Simply enter your GMC Code.
See Adding a Shared Care User for details of adding a GMC code to the V360 Clinical Portal.
- Once the statement is completed, select Print
 .
. - Wales only - The Choose a language screen displays, select to print the eMED3 in:
- English, or
- Welsh
and then select Confirm.
- Depending on your settings, the Print Preview screen may display, if it does, select:
- Print
 , to print, or
 - Back Arrow
 , to return to the previous screen.
See General Printing Preferences for details. - Print
- The Printing successful screen displays, select either:
- Confirm - To confirm, or
- Reprint - To reprint the eMED3.
- Finally, select Save
 .
.
The PDF created saves as an attachment in Vision 3 - Consultation Manager.
See eMED3 in Vision Anywhere and Reprinting an eMED3 for further details.

