Prescribing EPS Prescriptions Remotely Using Vision Anywhere - England only
If you are using Vision Anywhere for your remote consultations, you can send any acute therapy back to Vision 3 to issue as an Electronic Prescription Service (EPS) prescription.
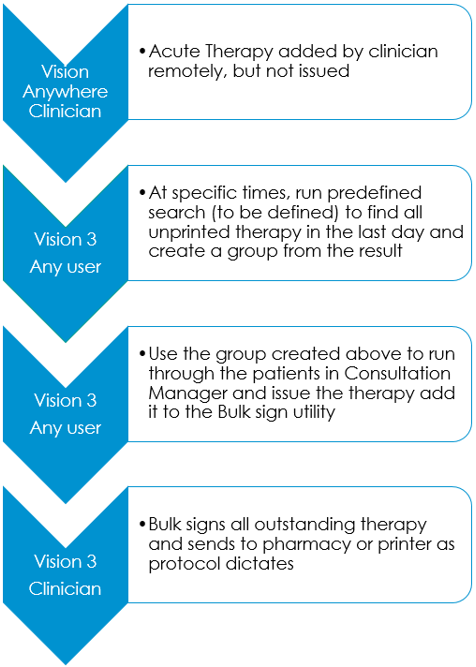
Workflow
Downloading and Importing the Acute Therapy Added - Not Yet Printed Search
To download and import the Acute Therapy Added – Not Yet Printed Search:
- From the Search and Report Help Centre, from Downloads – Vision 3 Predefined Searches, select the Acute Therapy Added - Not Yet Printed and run through the download wizard, see Search and Report Help Centre - Downloads – Vision 3 Predefined Searches for the Acute Therapy Added – Not Yet Printed search.
- Now, log into Vision 3 if you are not already logged in and select Reporting – Search and Reports.
- From the Search export and import pane, select Browse
 .
. - Navigate to the search file you have just saved, highlight it and select Open.
- The file opens in the Search export and import pane.
- Right click on the search and select Import.
The search is now added to the list of saved searches in the left hand pane and is ready for use.
Adding Acute Therapy Remotely and Issuing as EPS
To add an acute therapy and issue it as an EPS prescription:
Remote Clinician
- From Vision Anywhere, select the patient required and open an Encounter in the usual way.
- Enter part of the drug name required, a minimum of three characters is required, a list of matching items displays. Add a space and the form for a shorter list, for example, amox cap for amoxicillin capsules.
- Select the medication required and the Add Prescription screen displays.
- Complete as required.
- Select Prescribe to save.
- Finish and close the Encounter.
Any member of staff
- From Vision 3 – Reporting – Search and Reports – Ad-hoc Search & Reporting, select and run the Acute Therapy Added - Not Yet Printed search to find all unprinted therapy in the last day and create a group from the result.
- From Consultation Manager, select Consultation – Select a Patient Group.
- The Consultation Manager – Groups or Clinical Audit Search Browser displays, select Group.
- Highlight the Unprinted Acutes group you have just created and select OK.
- The group of patients with unprinted acutes added today displays, select the top patient and select Select the Group Patient
 .
. - The selected patient’s record displays.
- Press <F9> and Prescription Manager displays.
- In Prescriber To Sign, select the clinician allocated to bulk sign these prescriptions.
- Select Finalise.
- Select Next Group Patient
 to open the next member of the group.
 - Repeat from step 12 above until all patients have been processed.
Clinician
- Log into Vision 3, either in the surgery or remotely using your Smartcard.
- From Consultation Manager, select List All Prescriptions
 .
. - The All Prescriptions screen displays, select the Authorised tab.
- All unsigned prescriptions allocated to you display.
- Select the top patient on the left, check the details on the right and, providing you are happy, select Sign Selected.
- The Apply Advance Electronic Signature screen displays, enter your Smartcard passcode and select OK.
- Repeat from step 21 until all prescriptions are signed.
Further Information
For further information on topics covered by this Quick Reference Guide see:
Vision Anywhere
- Windows - Recording Medication
- iOS – Recording a Consultation
- Android – Recording a Consultation
Search and Reports
Consultation Manager