Appointments Back up - Hosted Server
To provide access to your appointment list in the case of a network problem, Vision 3 Appointments and Appointments release 3.2 onwards have an automatic text file backup available. We recommended you run the backup on two workstations, usually a front office workstation and a back office workstation. It is important that the backups do not run at the same time.
To enable the back up of Appointments to a local drive you must first configure your remote desktop connection to allow access. You can then configure Appointments to back up to the local computer.
To configure the remote desktop to access the local drive:
- From your main Windows screen, right click on the Remote Desktop icon and select Edit.
- The Remote Desktop Connection screen displays, select the Local Resources tab:

- Select More and then tick Drives:
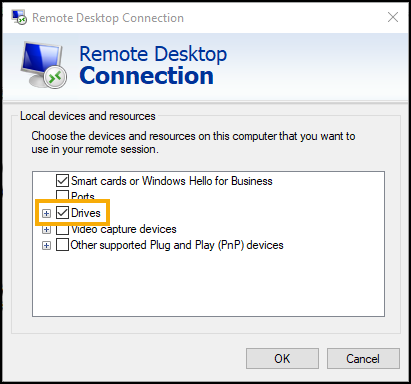
- Select OK to save.
- Now, select the General tab.
- Select Save As and the file name Remote Vision.rdp displays, select Save.
- You are prompted to replace the existing file, select Yes.
Create a new folder on your drive C:
- From the Windows menu select File explorer.
- Right click on Local Disk (C) and select New - Folder.
- Enter a name in New Folder, for example, BackUp.
- Press Return on your keyboard and the new directory saves under the C Drive.
Once you have configured the remote desktop on the computer and created a new folder, you can activate the Appointments back up on both workstations:
Select the version of Appointments you use:
-
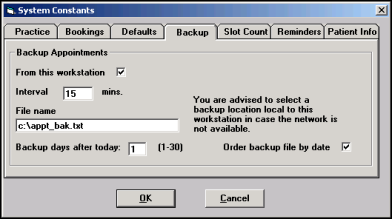
From the Vision 3 front screen, select Appointments – Maintenance – System Constants.
-
Select the Backup tab:
-
Complete as follows:
-
From this workstation – Tick, to select this workstation.
-
Interval – Set to 15 minutes on the front office workstation and 59 minutes on the back office workstation.
-
File name – Change to \\tsclient\c\BackUp\appt_bak.txt.
-
Backup days after today – Select how many days ahead you wish to backup, this ranges from 1-10 days, the recommendation being one day on the front office workstation and three days on the back office workstation.
-
Order backup file by date - Tick to list appointments in date order.
-
-
Select OK to save.
To access the backup, navigate to C:\BackUp on your local pc and the appt_bak.txt is available.
 release 3.2 onwards
-
From the Vision 3 front screen, select Appointments
 , or from your desktop, select Appointments
  and log in.
 -
Select the arrow next to you name and select Preferences:

-
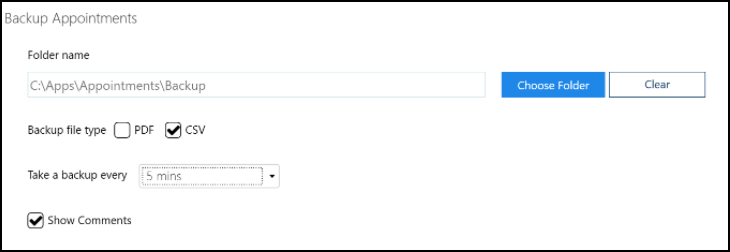
Select Backup and the Backup Appointments screen displays:
-
Complete as required:
-
Folder name - Select Choose Folder to select where you want your backup to store. Select Clear to clear the current location.
If a drive is no longer available an error message displays 'Selected backup location (file_location) is not available or cannot be written to. Please select a new backup folder. If you select to continue without backup then you may be prompted again when next opening Appointments.' Select from:
-
Try Again - Select to try the same location.
-
Change backup folder - Select to open the Browse for Folder screen and choose a new folder.
-
Continue without backup - Select to continue without a backup. Until a backup is set, you are prompted each time you log into Appointments.
-
-
Backup file type - Select whether to output the backup as a PDF (printable) or an CSV (Microsoft Excel) file.
-
Take a backup every - Select the backup schedule in minutes from the available list.
-
Show Comments - Tick to include Appointment comments in the backup file.
-
-
Select the Back arrow
 to save and close the Appointments Preferences screen.
The backup file contains one week of appointment data going forwards, including the current date. Each time a backup is taken the previous file overwrites.
prior to release 3.2
To enable you to run your surgeries and clinics in the event of network issues, you can export your Appointments lists to either PDF (printable) or CSV (Microsoft Excel) format.
To export appointments for a specific day:
-
From the Reception screen, select the day required.
-
Select Options
 and then Export Appointments.
 -
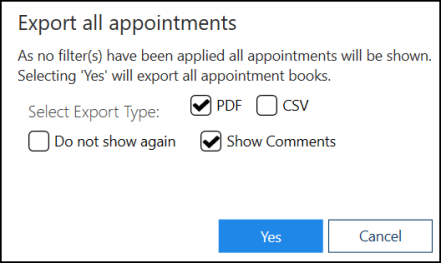
The Export all appointments screen displays:
-
Complete as follows:
-
Select Export Type - Select from:
-
PDF – Tick to create a printed list.
-
CSV – Tick to export the appointments into an Excel spreadsheet.
-
-
Do not show again – Tick to skip this screen in future.
-
Show Comments – Tick to include any appointment comments in the export.
-
-
Select Yes to start the export.
-
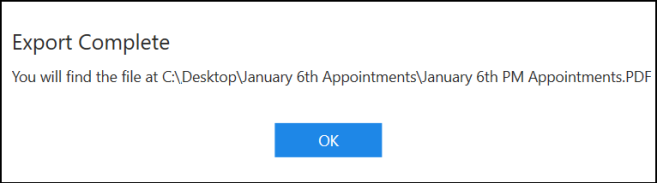
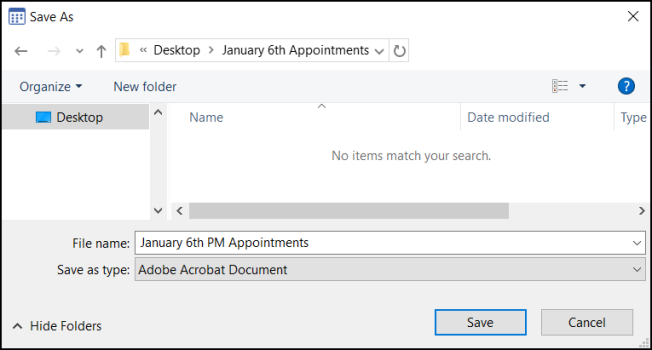
The Save As screen displays, select where to save the file to and give it a name:
-
The Export Complete screen displays, select OK to close: