Create Report
You can quickly create reports using the predefined queries.
- Select the Report Library > heading.
- The Report Library opens.
- Select the Actions button in the bottom right corner of the screen:

- Select Create Report. The new report screen displays.
- Select a query from the list on the left hand side of the screen or use the Search box. For example, Scheduled Core Hours:

- To add further criteria, hover near the text box and select the Add
 button. A second text box displays.
 - Select an additional Query from the list. For example, Scheduled HCP type GP, to show GP appointments.
- Define the relationship between the groups:
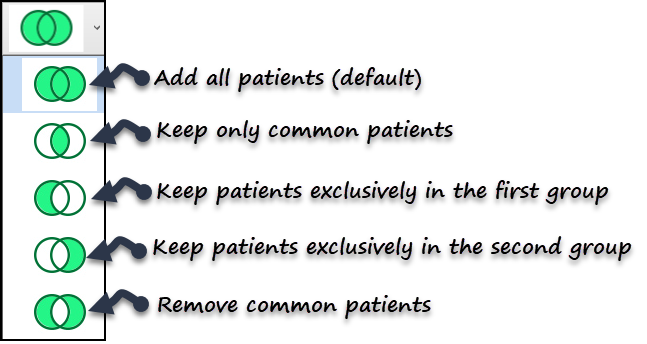
- Add all patients (default) - Keeps all the patients in the groups
- Keep only common patients - Keeps only patients that are in both groups
- Keep patients exclusively in the first group - Removes any patients that are in the both groups and does not import any patients in the joining group.
- Keeps patients exclusively in the joining group - Removes all patients from the first group, including any patients who are in both groups.
- Remove common patients - Removes any patients that are in both groups.
- To add further queries or remove a query, hover over the report detail box to activate the Add and Remove buttons:

- Click the Next
 button in the bottom right of the screen to proceed.
 - Complete the Report Details form:

- Title - Report Name
- Description - Report Details
- Chart Type - Display options - Bar / Chart / Table
- Group By - Select the group by options from the drop down list
- Date Offset (days) - Choose the date range for the report from the drop down list.
- Select Save Report to proceed, alternatively choose Cancel to delete.
- The new report is available in the Report Library.
See Viewing Reports and Report Drill Down for more details.
Note – To print this topic select Print  in the top right corner and follow the on-screen prompts.