Adding a New Patient - England only
This is a step by step guide to adding a new patient to Vision 3 in England.
In England, before you can add a patient to Vision 3, you must trace them via the Patient Demographic Service (PDS). Once their details are located, they can be registered to your practice.
To register a new patient:
- From Registration
 , select New Patient
  .
. - The New Patient screen displays:
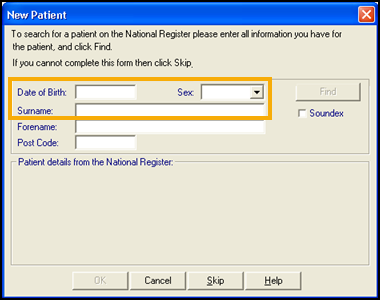
- Enter the patient details as required:Note - You must complete all mandatory information unless you have the patient’s NHS Number.
- Date of Birth - Mandatory, any conventional format can be used, Vision 3 arranges the numbers into the PDS required format (DD/MM/YYYY).
- Sex - Mandatory
- Surname - Mandatory
- Forename
- Postcode - This must be in full, for example, SW8 3QJNote - Tracing on postcode searches all current addresses stored in the PDS. In an advanced trace, both current and historic addresses are searched.
- Select Find
 to trace the patient on the PDS, see Tracing a Patient before Registration - England only for details if required.
 -
One of the following scenarios can occur:
 Single patient found on the PDS
If only one patient is identified from the PDS search, the full patient record is retrieved. If the returned NHS Number already exists on your system, you are given the option of editing the existing patient or returning to the New Patient screen:

Select OK.
Single Patient not found on the PDS
If a patient is not found the 'No Match to a Service User Record' message displays:
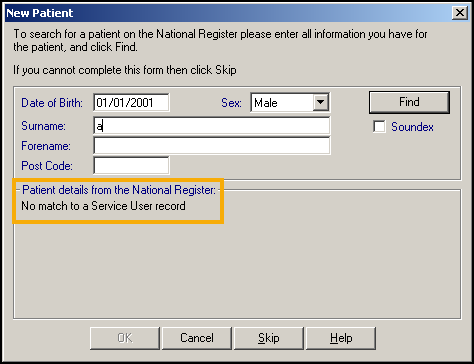
You have two options:
- Find out more information from the patient and attempt another trace (recommended).Remember - Use the postcode for the patient’s previous address.
- Register the patient locally to Vision 3 by selecting Skip
 . Important - This is a last resort. The patient is not initially synchronised with the PDS which impacts access to the National Services and the GP2GP record transfer.
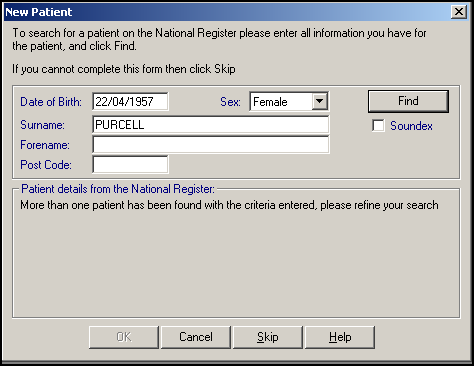
Multiple PDS Matches Returned
If your trace matches with more than one patient the 'More than one patient has been found with the criteria entered. Please refine your search' message displays:
 NHS Number Already Exists on Vision 3
If the NHS number of the matched patient already exists on Vision 3, the 'A patient already exists' message displays:
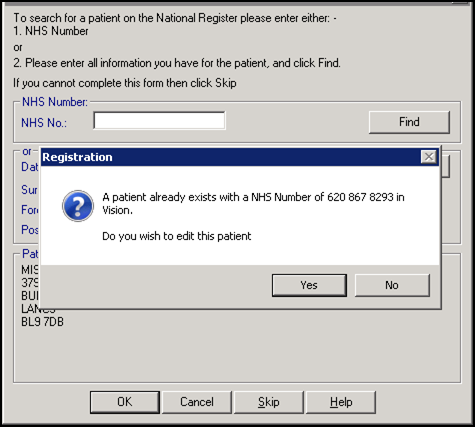
Select Yes to update the existing record.
- Find out more information from the patient and attempt another trace (recommended).
-
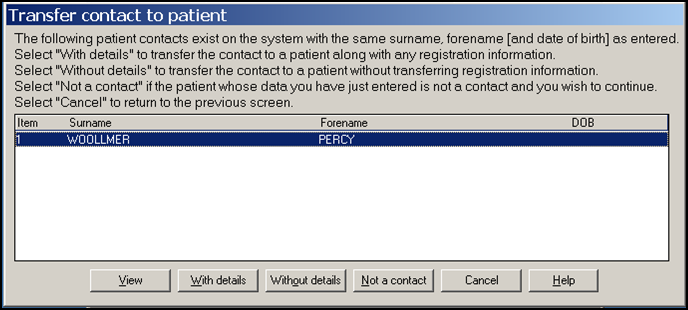
After finding a patient on the PDS system, Vision 3 checks to see if the patient has been recorded as a contact, if they have, the Transfer Contact to Patient screen displays. Select from the available options:
-
View - Displays the contact details to enable a decision.
-
With Details - Transfers the contact to a patient along with any registration information.
-
Without Details - Transfers the contact to a patient without any registration information.
-
Not a Contact - Select to ignore the contact:
-
-
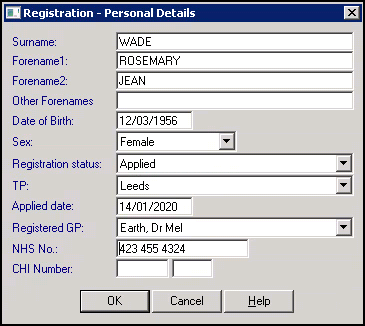
The Registration - Personal Details screen displays:
-
Check the details and then select OK.
-
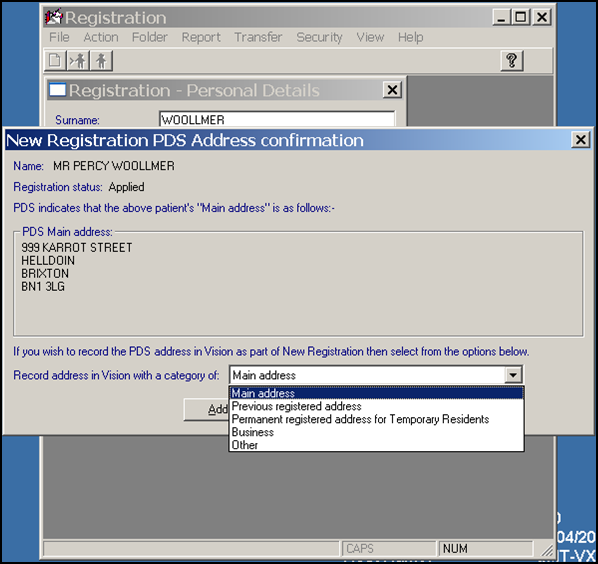
The New Registration PDS Address confirmation screen displays:
-
Select the most appropriate address category for the address displaying and select Add. If you select:
-
Main address, the address saves to Main address.
-
Previous registered address, you must add a Main address.
-
Permanent Registered Address for Temporary Resident, you must add the temporary address to the Main address section.
-
Business or Other, you must add a Main address.
-
-
The Personal tab displays, complete any information required and select Next.
- The most common tabs display one at a time, complete and select Next to move to the next tab.Training Tip - You can select and update any of the available tabs as required:
- Address - See Address Tab for full details.
- Registration - See Registration Tab for full details.
- Notes - See Notes Tab for full details.
- Other - See Other Tab for full details.
- Ids - See Ids Tab for full details.
- Family - See Family Tab for full details.
- Consent - See Consent Tab for full details.
- Online Services - See Online Services Tab for full details.
- Preferences -See Preferences Tab for full details.
- Check the Incomplete Details and Incomplete RegLinks indicators at the top if the screen, if:
- Incomplete Details has a tick, you have missed out some optional information.
- Incomplete RegLinks has a tick, you have not completed enough information for Registration Links, select Action - Acceptance and look for missing mandatory information:
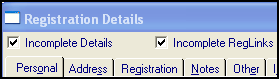 See Incomplete Details and Incomplete RegLinks for further details.
- Select OK to save.
- If the patient has incomplete details, a warning displays, select:
- Yes to continue, or
- No to return to the registration screen and complete any missing information.
-
Providing you clear the Incomplete RegLinks tick before selecting OK, the patient's Registration record is frozen and you cannot update their Registration details until they are accepted via the Registration Links process.
See Frozen screen and Editing Registration Details for further details.